Even though it’s still early in the month, Halloween will be here before you know it! There are a multitude of festive, family-friendly events that parents and children can enjoy. A good way to get into the holiday spirit is to start decorating your home with your children. It also promotes family bonding, creating memories that will last a lifetime. Below is our guide to 5 festive and spooky DIY home projects for Halloween.
DIY Crafts to Get into the Halloween Spirit:
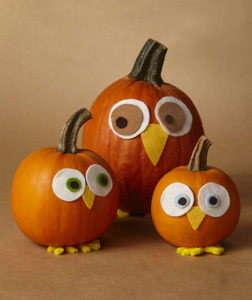
Cute Owl Pumpkin – No Carving Needed:
For safety purposes, we suggest this no-carve pumpkin activity to do with a younger child. The materials are simple and easy to assemble. First, you need to gather a large orange pumpkin to serve as the body of the owl, one medium colored orange pumpkin, and three small white pumpkins to act as the eyes, beak, ears and feet. Other necessary supplies include toothpicks, newspaper, tablespoons, permanent marker, and a sharp knife that should only be handled by an adult.
- Cut two of the small pumpkins in half. The bottoms of each of these pumpkins will serve as the owl’s eyes.
- Position the bottom halves of the small pumpkins on the bigger pumpkin. Then, push through two toothpicks to hold it in place.
- Proceed to create the ears, beak and feet. Insert the toothpicks where they should be positioned, and then push the pumpkin pieces onto them to cement them.
- Using the permanent marker, write the word “HOO!” on the best-looking side of the medium sized pumpkin, and then place it next to the completed owl pumpkin
Additional suggestions for no-carve pumpkins can be found here.
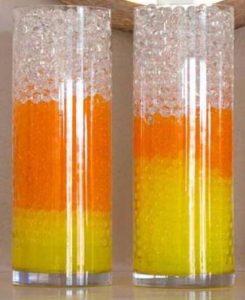
Candy Corn Water Beads:
Water beads are simple and easy to use, making them perfect for holiday décor. We recommend using a combination of clear or white, orange, and yellow for your color scheme. You can also do black, clear or white, and gray for a spookier atmosphere. For supplies, you need 2 packs of whatever color you choose, 3 to 4 tall vases, 36 gallons of water, and 3 glass or plastic bowls for soaking the beads. Depending on the size of your vase, you can use one packet of each color of water beads.
- To begin, you need to soak the beads for 4-6 hours to get them to achieve full size. To dry the beads for storage, lay them on a dry surface.
- Once they’ve dried, fill the vases with your color choice to different heights in each vase. To add the second color, carefully pour the beads on top of the first color.
- Proceed to do the same with the third color. Once the vases have been completed, place them around the house as you wish, whether together or separate.
Spooky Halloween Soap:
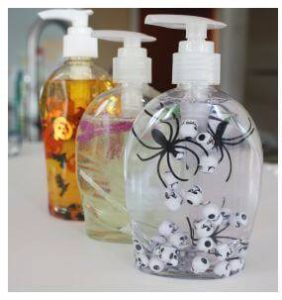
We suggest using clear hand soap, sanitizer, or all-natural soap. If you have trouble removing the labels off the containers, rubbing alcohol can help.
- Creating Halloween soap doesn’t take a lot of time. Parents can help their child open the containers and drop the decorative objects inside. Items that are good to insert into the hand soap include plastic spiders, plastic eyeballs, and other small Halloween plastic-related items.
- Use a skewer or another similar-sized object to push the items down. Most things will eventually settle but you might need to give it a shake.
Leave a Halloween soap at each sink in your house. If allowed, have your child bring one to his or her classroom. Additional science and sensory activities can be found here.
Front Door Decoration:
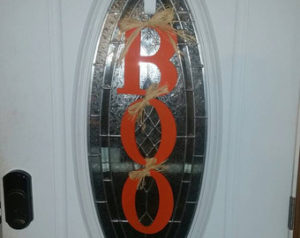
Wreaths aren’t just for the Christmas season! To decorate your front door, hang up a fun “BOO” sign. Minimal supplies are needed for this project, and can be located at your local arts and crafts store. The requisite supplies are as follows: thin, lightweight wooden letters, black spray paint, black glitter, orange ribbon, and a stapler. After purchasing your supplies, follow the steps below to decorate your door.
- Lay your letters out on cardboard. We recommend spraying half a letter at a time, sprinkling glitter on that half, and then proceeding to do the same with the other half. You can spray the letters with a clear protective spray to make sure that the glitter holds.
- After you’ve given the glitter enough time to dry, wrap two letters at a time with a ribbon and staple the ends of the ribbons together. (The B and the O will be together and the O and the O should be stapled together.)
- Once the letters have been assembled, hang it up on your front door!
Easy Tissue Paper Pumpkin Favors:
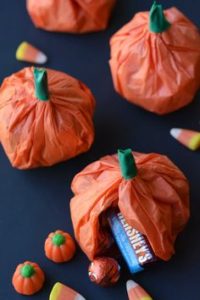
These easy to make tissue paper pumpkin favors are the perfect add-on to your child’s Halloween party. The supplies are easy to assemble, just make sure you have orange tissue paper, green tap, different types of candy, cake pan, scissors, and pencil.
- Combine two pieces of tissue paper together and draw the outline of a circle. You can use the cake pan to draw the circles. If you are planning on making more than one pumpkin, use 6 to 8 sheets.
- Using scissors, cut out the circle.
- Once you have a circle, pile the assorted candy into the center of the circle. Put in a little at a time to make sure the tissue paper can hold them without breaking.
- Use your fingers to carefully bend the paper around the candy. Gather up the edges, and then pinch and twist them closed as best as you can.
- Using the green tape, cut a small piece and wrap the tape around the twisted end. Keep twisting it around until you’ve achieved a pumpkin stem. Your miniature pumpkin party favor is complete!
Contact the Nanny Authority Today!
Our Pinterest boards have a variety of suggestions for other themed arts and crafts as well. At the end of the day, the holiday season is about creating memories with our loved ones. For more information on how the Nanny Authority can help your family with Halloween, contact us via e-mail or at 973-466-2669 today!


