It’s the most wonderful time of the year. Crisp leaves crunch under your feet, whipped cream and marshmallows float on top of your hot cocoa, and all of the holiday cookies!
We at the Nanny Authority LOVE the holiday season and spending time with our family and friends during this most magical time. As a gift to you, we have two fall-tastic activities for you to enjoy with your family, no matter how little or old your children are.
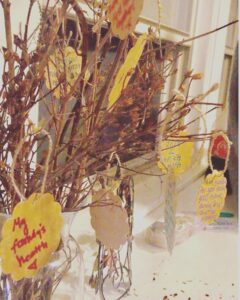
Family Gratitude “Tree”
Regardless of whether your family celebrates Thanksgiving or not, gratitude is always in style, and even more so during a time of year when so many around us reflect on what we are thankful for. If you love DIY activities we have the perfect family gratitude tree for you and your family to create at home. Check out this fun fall activity that can double as a Thanksgiving centerpiece.
Supplies
- Branches/Twigs
- Vase or Flower Bucket
- Small basket or bucket
- Kraft Paper Gift tags or Leaf Tags (we loved this and this)
- You can also DIY with colored cardstock and a leaf template like this and scissors/hole punch)
- Markers (we recommend washable) or crayons for children 5 and under
Instructions
- Get outside with your family and collect some branches and twigs that are dry and have a variety of lengths and shapes. If you don’t have time to get into nature you can opt for something like this too!
- Once inside with your twigs, make sure they are clean, and grab your vase or bucket of choice. Fill the bucket with the twigs to look like a tree. It does not have to be compacted, you can allow for space as you desire between branches.
- We encourage you to include your children in the process of either stringing twine into the gift tags or cutting out leaves on cardstock and using a hole punch (with supervision of course). Once all of the tags have twine strung in them tie the twine so there is a loop large enough for the tag to rest loosely on a branch, somewhat like a Christmas ornament.
- Set the prepared tags to the side in a small bucket or next to your gratitude tree.
- Before your Thanksgiving dinner, or whenever feels right for your family, take some time to talk with your children about gratitude and what it means to give thanks. Let everyone take tags to write down what they are thankful for and place on the tree.
- Leave your gratitude tree up during the holiday season and enjoy!
We are so grateful for YOU and all of the amazing work you do with your littles everyday. Need some more gratitude tree ideas? Find more gratitude tree inspiration here! Share your trees with us on social and tag @thenannyauthorityinc
Handprint Turkey Cookies
Handprint turkeys are a classic craft during the month of November for most early childhood-aged children. We know when we were little, we remember tracing our hands and coloring each finger on the paper to resemble a turkey feather. At Nanny Authority we thought, why not combine our love for nostalgia with the classic tradition of holiday baking? Enter, the handprint turkey cookie.

Supplies
- A roll out sugar cookie recipe (see below!)
- A royal icing recipe (see below!)
- Cardstock or construction paper
- Pencils
- Scissors
- Stand mixer
- Rolling pin
- Paring or X-Acto knife (for ADULT USE)
- Baking sheets
- Parchment paper or silpat nonstick baking mats
- Pipings bags or spoons
- Toothpicks
Instructions
- Using a pencil, trace your child’s hand onto a piece of cardstock or construction paper. (Don’t forget to trace your own as well, this is a family affair after all.)
- Cut each hand out.
- Roll out your cookie dough to about a 3/8-inch thick (1/4 inch works too!), place your cardstock hands on top of the dough and trace around the hand with a sharp paring knife.
**this is an adult-only step**
- Transfer your cookie dough hands over to your lined baking sheet.
- Bake per recipe instructions below.
- While your cookies are baking, mix all of your icing colors with colors of your choice. We recommend light brown, dark brown, red, green, yellow, and orange.
- After your cookies have cooled, outline the thumb and palm of your hand cookie with stiff light brown icing.
- Fill the light brown outline with a thinner light brown icing. Pop any bubbles and drag your icing with toothpicks to adequately fill the space.
- Outline each of the remaining fingers in a different color and repeat the outline and fill process from steps 7 and 8.
- Your icing should form a “crust.” It is not dry but the top layer is drying and almost looks like a thin protective shell. Once this crust has formed, take a small piping bag with dark brown icing and make a small eye on the thumb of your cookie. Use the dark brown icing to draw wings on the body of the turkey (the palm). Make small legs in the lower center of the palm by drawing two vertical lines and a small upside-down v on the lower half of each line.
- With your orange outline consistency icing, make a small triangle for the turkey’s beak facing outwards. With your red outline consistency icing, draw your turkey’s wattle (the red skin) underneath the turkey’s beak.
- Let your cookies dry for 8 hours or overnight so that royal icing is completely dried before enjoying your cookies. Most importantly, just have fun with it! Let your children explore and play and make holiday memories as a family.

Nanny Authority’s Sugar Cookie Recipe
Non Food Supplies
- Stand mixer or hand mixer
- Baking sheets
- Parchment paper or Silpat mats
- Spoons
- Measuring spoons and cups
- Tall drinking cup
- Small mixing bowls
- Silicone spatulas
- Piping bags
- Toothpicks
Sugar Cookie Ingredients
- 1 C salted butter (2 sticks)
- 1 C granulated sugar
- 1 tsp baking powder
- 1 tsp vanilla extract
- 1 egg
- 3 C all-purpose flour
Sugar Cookie Instructions
- Preheat oven to 350° degrees F.
- When your butter is still cold, cube and set aside.
- Crack 1 egg in a small bowl and add 1 tsp of vanilla extract. Set aside.
- Prepare your baking sheet with your Silpat mats or parchment paper.
- Add your cubed butter and your sugar to the stand mixer bowl and mix with a paddle attachment on speed 3-4 until combined and creamy (approx 2 minutes).
- Once combined, add your egg and vanilla and mix on speed 2-3 until ingredients are fully combined (10-15 seconds). Do not overmix at a higher speed.
- Add in your baking powder and mix for 10 seconds maximum.
- Add in your flour slowly while the mixer is on low. Pour in half of the flour, let it combine in the mixer, and then add the remaining flour.
- Your dough is ready when it pulls away from the sides of the bowl. Add small amounts of flour while mixing if needed.
- Take your dough out of your stand mixer and roll in between two sheets of parchment paper to 3/8 or ¼ inch thick. Chill your dough in the freezer for 5-15 minutes. (this step is important if you are hand cutting with a paring knife or X-Acto)
- Cut your cookie shapes and place them onto your prepped baking sheets.
- Bake for 15 minutes at 350° degrees F.
- Take your cookies out with oven mitts and let them cool for 5 minutes before transferring to a cooling wire rack.
Royal Icing Ingredients
- ½ C Meringue Powder (we love this brand)
- ½ C lukewarm water
- 1 LB confectioners’ sugar (powdered sugar, we recommend Domino)
- Food coloring as needed (we love this brand)
Royal Icing Instructions
- In your stand mixer combine your meringue powder and lukewarm water on a 3-4 medium speed until frothy. (It should almost look like beer froth)
- Lock your stand mixer (this is important) and ensure your pouring shield is secured on top of your mixing bowl.
- Slowly add in your confectioners’ sugar and mix on low. The icing will become incredibly stiff and you may need to add in teaspoons of water as it mixes.
- Mix the icing until you can stick a silicone spatula in the icing and it the icing comes out stiff enough it stands tall and flips over the spatula with a “dollop.”
- Now is the time to separate the icing into smaller bowls and mix in your desired color. Add in a small teaspoon of water to loosen the icing a little but it should still be stiff enough that it can, “dollop,” over a silicone spatula. It should be the consistency of toothpaste. This is your outline consistency.
- Take your piping bags and insert them into your tall glass. Fold the top of the bag over the rim of the glass.
- With your spatula slide half of the icing into your piping bag as far down as it can go. Pull your piping bag out of the glass and tie the top of the bag. Gently massage the bag to eliminate any air bubbles.
- With the other half of the colored icing, add in a teaspoon of water at a time and mix with your spatula until the icing is about the consistency of shampoo. This is your flood consistency. Repeat steps 6 and 7.
- When you are ready to ice your cookies, cut a small hole on the seam of the piping bags and decorate as desired.
Find more icing tips and tricks here and here.
We want to wish a very Happy Thanksgiving to everyone who celebrates. Looking for help during the holiday season? Find creative and dedicated childcare workers at the Nanny Authority. Contact us via email or at 973-466-2669 to fill your home staffing needs before the new year!
Photos from Taste of Home and Stock Piling Moms. Find more Hand Turkey cookie ideas and step-by-step photos here.