
Halloween is almost here, and you’re no doubt thinking about how best to keep the children safe while trick-or-treating on Saturday. It’s an important thing to consider, but not necessarily for the reasons you’d assume. Although of course it’s important to check the kids’ candy and make sure they’re not going to any unknown homes, the largest danger lies elsewhere. According to the Center for Disease Control, children ages 5-14 are four times more likely to be killed by a pedestrian/motor-vehicle accident on Halloween than any other day of the year.
This is important information for nannies as well as for parents, so we’ve put together a handy safety guide for each step of the process: before you leave, while you’re out trick-or-treating, and once you get back home.
Precautions to take before leaving
Be sure the child’s costume is an appropriate length; otherwise, they may trip and fall. If possible, choose face paint and makeup instead of masks, which can slip and obstruct the child’s vision. If the costume includes accessories, make sure they are flexible, soft, and made of plastic or rubber to prevent injury. Have the children wear comfortable shoes to sidestep any potential whining, tears, or tantrums.
To ensure the child is visible at night, it’s best to dress them in a bright-colored costume. If the costume is dark, decorate the edges with reflective or glow-in-the-dark tape or stickers so the child can be seen by motorists and other kids.
Map out your route in advance! The kids often like to help with this—especially if you tell them you’re planning for maximum candy potential.
How to remain safe while trick-or-treating
Because of the likelihood of drunk or irresponsible drivers, traffic safety is of utmost importance during Halloween. Make sure kids obey all traffic signals, look both ways, and remain in designated crosswalks when crossing the street. Ensure the children are looking where they’re going, especially around intersections; this is not the time to be looking at an electronic device.
If the children are under 12, they should be accompanied by an adult. If your child is mature enough to go trick-or-treating without a chaperone, make sure he or she is traveling with a group; no child should trick-or-treat alone. Be sure each person in the group is carrying a flashlight, and try to stay in well-lit areas. It’s also smart to provide the children with a cell phone in case of separation.
When walking from house-to-house, kids should always remain on sidewalks; running across lawns and streets can be dangerous and lead to injury. If the children are trick-or-treating unsupervised, be sure they know to avoid strangers, poorly-lit areas, and the homes of people they don’t know.
When you return home
Before the kids go crazy sorting through all the candy they’ve collected, be sure to inspect their bags. As a rule, you want to make sure there is no loose candy, open glasses or bottles, fresh fruit, or homemade goods. If you know who made certain homemade treats, use your best judgment; however, with anything of unknown origin, it’s better to be safe than sorry. Throw away any candy that looks like it has been opened or is not in its original wrapper. Never eat unwrapped candy.
Bonus 5-Step DIY Canvas Candy Tote!
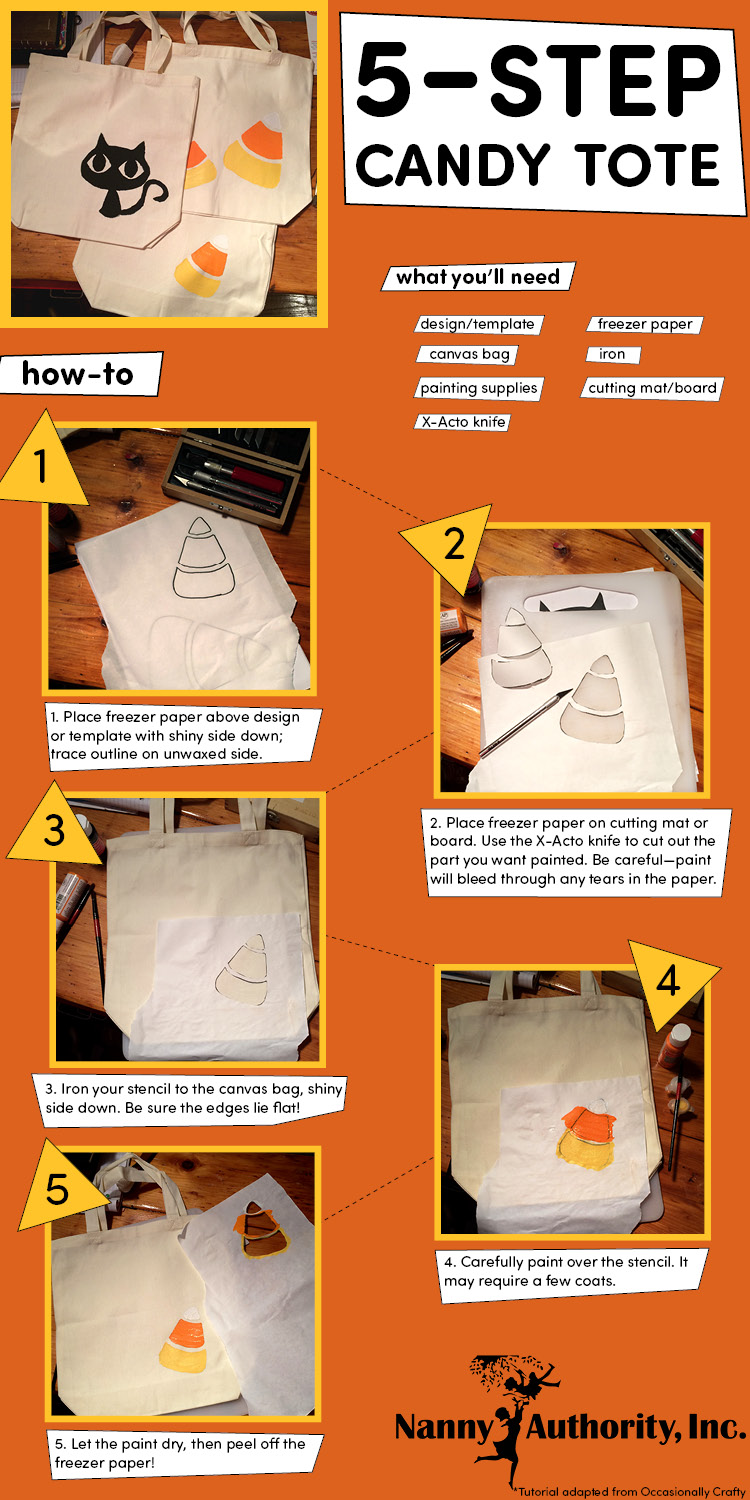
Supplies needed:
- Canvas tote bag(s)
- Freezer paper
- Design or template, printed out
- X-Acto knife
- Cutting mat/board
- Painting supplies
- Iron
Instructions:
- Place freezer paper above design or template with shiny side down; trace outline on unwaxed side.
- Place traced freezer paper design on cutting mat or board. Use the X-Acto knife to cut out the negative space (the part you want painted). Be careful—paint will bleed through any nicks or tears in the paper.
- Iron your stencil to the canvas bag, shiny side down. Be sure to iron down all edges of your stencil to seal it. Otherwise, the paint can bleed outside the lines.
- Carefully paint over the stencil. It may require a few coats. Be careful to not load the paper up with too much excess paint!
- Let the paint dry, then peel off the freezer paper!
Note: If you use this idea for clothing (or anything you plan to wash), be sure you’re using permanent fabric paint, and once the paint is dry, place a cloth over it and iron again. Otherwise, the paint will fade after washing.